Tuesday, November 27, 2012

Baked Apple Pie - In an Apple


For Thanksgiving with my family, I was put in charge of the desserts.  I wanted to do something that wasn't extremely heavy because it seems like no one hardly eats desserts after such a big meal.  I created these apple pies, baked in an apple, after I saw it on Pinterest. 

This dessert was a big hit! Everyone loved it.  I only made 4 total, because I had brought along another small dessert; but, I wish I would have made more.  The only challenge I came across when making this was trying to keep the apples from browning.  I know there are tricks and techniques out there to prevent the browning, but I just worked quickly and added some lemon juice on top of the apples.  I fully baked these at home and the night before.  After Thanksgiving dinner, I popped them in an oven safe dish and put them in the oven at 300º for several minutes to warm them back up.  

Baked Apple Pies: In an Apple

8 Granny Smith Apples
1 tsp cinnamon
1/4 c. sugar {I used baking splenda}
1 Tbsp brown sugar
Pie Crust {I used the Pillsbury refrigerated kind}

*8 Granny Smith Apples -
4 apples used to bake the pie with;
4 apples used to cut up for the apple chunks for the pie filling

Preheat oven to 375º.

Cut the tops of the apples off and remove the inside (core out) the apple.  You can do this with either a spoon or melon baller {be careful not to puncture a hole through the apple}.  I went ahead and tossed the inside of the apples down the drain - they were all in little pieces and browned before I was able to even attempt to save any of it to use for the pie filling.

*After removing the insides of each apple, I squirt some lemon juice on the inside, placed in a plastic ziploc baggie and put in the fridge until ready to use again.

Using the other four apples, cut up the apples in small pieces {remove skin}.  In a mixing bowl, mix the diced apples with the cinnamon, sugar, and brown sugar.  Spoon the mixture into each hollowed apple.

Roll out pie crust into thin strips and place a lattice {or any other type of pattern} across the apples.

Fill an 8x8 baking dish with just enough water to cover the bottom.
Cover with foil and bake for 20-25 minutes.  Then, remove foil and bake for an additional 20 minutes, or
until crust is golden brown.

*Optional step: once you take the apples out of the fridge, you can line the apples with some of the pie crust.  I used to top of a glass cup to cut a circle out of the crust and molded it to the inside of the apple before filling with the apple mixture.

Enjoy!!!

Monday, November 19, 2012

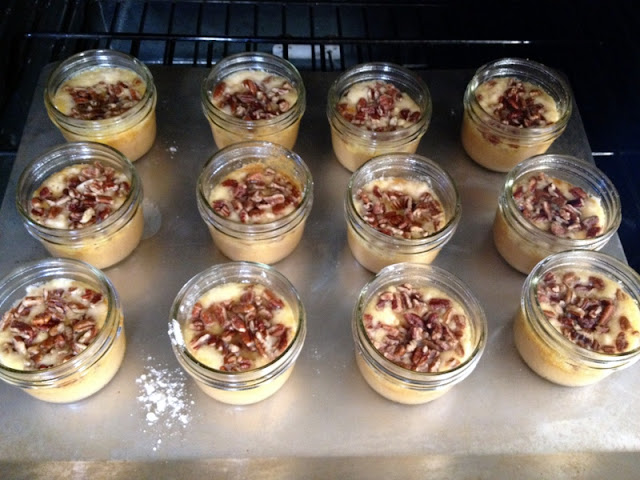
Pumpkin Pecan Pie: In a Jar


I can't remember how I originally stumbled upon this recipe. I had wanted to try out a dessert jar recipe for awhile and thought this one sounded delicious.  I went to World Market and bought some individual glass jars (they are very reasonably priced).  I grabbed 2 different sizes so that I could experiment with both.  I decided the smaller jars are more appropriate for individual desserts.  These little jarred pies are delicious and easy to make.  Desserts in a jar are now one of my favorite ways to bake little individual desserts.  You can get very creative and come up with some of your own ideas, too.  Mix and match all sorts of different recipes!

I followed the recipe that is below, the only thing that I did different was that I added the turkey on top of the pie.  I just used Pilsbury refrigerated pie crust and my stamper cut outs from William-Sonoma to make the turkeys.  I placed them on top of the pies about 7 minutes before they were done baking. 

Pumpkin Pecan Pie:
In a Jar
{source: Glorious Treats}


1-15 oz. can of pumpkin
1 can (12 oz) evaporated milk
3 eggs
3/4 c. sugar
4 tsp. pumpkin pie spice
1 pkg yellow cake mix
1 1/2 c. chopped pecans
3/4 c. butter, melted
whipped cream, cool whip, or ice cream for topping (when served)

Preheat oven to 350ºF.
 Place each jar on a cookie sheet and spray each jar with non stick cooking spray. 

In a large mixing bowl, whisk together pumpkin, evaporated milk, eggs, sugar, and pumpkin pie spice.
Fill each jar with about 1/2 cup of pumpkin mixture. 
Sprinkle 1-2 Tbsp of dry cake mix on top of the pumpkin layer.  
Then, sprinkle approx 1 Tbsp of chopped pecans on top. 
Pour 1 Tbsp of melted butter on top. 


Bake for approximately 40 minutes {insert toothpick in center of jar and if clean, then pies should be done baking}. 
**If adding a turkey or some other pie crust cut out on top, place on top of pies approximately last 7 minutes of baking.
Cool for at least 30 minutes before serving.  If not serving right away, I recommend placing them in the refrigerator. 

Enjoy!!!

I doubled the recipe and made enough for Chris to take to work for his co-workers and families.  I placed them all in a wicker tray, which allowed for easy transportation.   And I was pleasantly surprised several days later when he brought back the empty jars.  I thought it was so nice of everyone to return the jars!!


Have fun with this recipe!! And think about all the other options and types of pies or cakes you could bake in a jar! 

Friday, November 9, 2012

"The 'Best' Stuffing Ever"


I am such a fan of the holidays - Thanksgiving & Christmas.  Nothing makes me happier than spending time with family, relaxing, and cooking some good meals!  If you know me, my favorite dish at Thanksgiving is probably stuffing.  No one else is my family really loves stuffing, so when I was younger my mom would make the kind just from the box - you know, Stovetop.  I think I have pretty much grown up on Stovetop stuffing/dressing, but have always really liked it.

About 2 years ago, I stumbled upon a recipe for homemade stuffing on a blog that I frequent.  There are quite a few ingredients - which always steers me away from a recipe (I'm such a daring cook!).  However, I have always wanted to make the stuffing.  The name of it is quite catchy, "The Best Stuffing Ever".  I finally decided to tackle the recipe and it did not disappoint.  Although I'm not going to be making it for the actual Thanksgiving dinner this year, I think we may need to add it in next year!


The Best Stuffing Ever
{Adapted from: Picky Palate}


1 lb sourdough, cubed (I bought mine pre-cubed)
12 oz. baked cornbread, cubed
14 Tbsp butter
1 large onion, diced
2-3 cups diced celery
2 cups chopped carrots
2 Tbsp minced garlic
2 1/2 cups chicken broth
1/2 cup fresh chopped parsley
2 Tbsp fresh rosemary
1 Tbsp fresh sage
1/2 tsp ground thyme
1/2 tsp salt
1/2 tsp pepper
1 lb Jimmy Dean Sage Sausage


Preheat oven to 350ºF. Place cubed sourdough and cornbread on large baking sheet and bake for 20-25 minutes, until lightly toasted. Then remove from oven.

Melt butter in large rimmed skillet on medium heat. Saute onions, celery, and carrots for about 10 minutes, or until veggies are tender.  Stir in garlic and cook for another couple minutes.  Then pour in chicken broth, parsley, rosemary, sage, thyme, salt, and pepper.  Stir and reduce heat to low and simmer.

Brown sausage in skillet and drain.  Then add to veggie mixture.  Place bread cubes into a large bowl and slowly pour mixture over cubes, gently stirring throughout to ensure all pieces are coated evenly.

Spray large baking dish, 11x7, and bake for approx 25-30 minutes - just until lightly browned on top.  Remove from oven & enjoy!!

To view step-by-step instructions/original recipe -- Picky Palate - The Best Stuffing Ever

Wednesday, November 7, 2012

{Best Ever} Chocolate Chip Oatmeal Cookies


Before I started nursing school, I had to take a couple prerequisite courses - one of them being physiology.  Physiology was by far my favorite course.  I love understanding how and why everything works the way that it does.  I think another reason I loved the course so much was because of my amazing teacher.  She was so good at teaching the course and was able to teach to us so that it made sense to us (versus just memorizing material for an exam).  

Before each exam we had a study review in class.  At each review, she would bring homemade chocolate chip oatmeal cookies.  Everyone begged her for the recipe, but she said she wasn't going to give it out until the end of the course on the last review session (incentive for everyone to attend!).  She kept her promise and shared the recipe with us.  She got the original recipe from when one of her children attended some sort of summer camp.  She told us that she got the recipe, made it at home, and it tasted nothing like what she had tried.  She said she had contacted the people about the recipe and they gave her very detailed step by step instructions on how they put together the recipe.  From what she told us, she said that it is very important to mix this recipe by hand (no kitchen aid, no blender, etc) - just a good old fashion baking spoon!  

I don't have a picture of these cookies at this time.  I just really wanted to get this recipe saved somewhere so I don't lose it.  I still have it written down on the back of one of my review sheets - and there is vanilla, flour, etc. all over it! 

{Best Ever} Chocolate Chip Oatmeal Cookies

1 c. margarine (2 sticks), room temperature (I use Fleishmann)
1 c. sugar
1 c. brown sugar
2 eggs
2 c. flour
1 tsp. baking soda
1/2 tsp. baking powder
1/2 tsp. salt
1 1/2 tsp. cinnamon
1 tsp. vanilla (do not use imitation)
2 c. old fashioned oats
1.5 c. semi-sweet chocolate chips (I like to use the chunks by Nestle)

Preheat oven to 350ºF.

Mix together (not with mixer): margarine, sugar, and brown sugar - until well mixed.
Add in eggs and mix together.
Next, add flour, baking soda, baking powder, salt, and cinnamon.  Mix together until well combined. 
Lastly, mix in vanilla, oats, and chocolate chips. 

Drop mixture by spoonfuls onto baking sheet and bake for 8-12 minutes.  Take out of oven before fully "cooked" - you still want it a little gooey.  Let cool for a couple minutes on baking sheet, then transfer onto foil and place in freezer. 

I usually keep mine in the freezer and eat them cold.  But that's just my preference! 

Enjoy!!!

Monday, November 5, 2012

KSU vs. OSU Game

This weekend we were fortunate to find some tickets to the KSU vs. OSU game.  Currently, KSU is ranked #2 and have remained undefeated.  We went down for the game Saturday and had such a great time!! We hadn't been back to Manhattan for quite some time - and I hadn't been back for a football game in nearly 3 years.

We got down early afternoon, grabbed some lunch, then headed out to tailgate.
{Chris & I tailgating}
{Sean & Liz}


After several hours of tailgating we headed into the game.


{At the game}
{KSU vs. OSU, 11.03.12}

The game was a good one! It was a little close at the beginning but we pulled through and won by quite a bit.  After the 3rd quarter, we caught the shuttle from the tailgating area and headed to Aggieville.  Oh, Aggieville, how I missed you!!  Even though I feel kinda old there now, we still went out and acted like we were in college.


{Chris & I at Porters}

{Porter's, 11.03.12}

{Porter's, 11.03.12}

{Sean & Liz}

{Liz & I}

{Pat & Jenny}

{Sean & Liz}

 The weekend in Manhattan was so much fun. It makes me regret not going to a game earlier.  K-State remains undefeated and has 3 more games left until the end of the season!